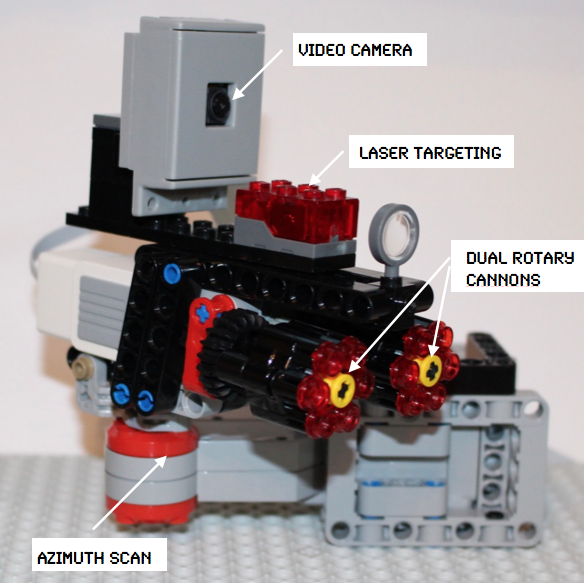
Weaponized LEGO Surveillance

The Raspberry Pi and Picamera offer many possibilities for inexpensive projects in
imaging. Things can get even more interesting when LEGO is added to the mix. An example is in
the photo above of using LEGO to pan the image view and activate stud shooters. Two EV3 motors
are used here: a Large Motor to pan the camera and a Medium Motor to fire the cannons. The motor
arrangement is similar to the design used in Chapter 7 of High-Tech LEGO. Motor control is hosted
by a BrickPi3 (dexterindustries.com) mounted on a Raspberry PI, with Python software controlling
everything. A targeting “laser” is also in the setup, based on a design in Chapter 1 of LEGO
Optics. This really isn’t a laser, but an LED so as not to create an eye hazard. To add
the Picamera to the LEGO structure, I used a camera mount made by Smarticase (smarticase.com).

The operator’s console is shown in the photo above using another device from Smarticase, the SmartiPi Touch. The display housed in the SmartiPi Touch gives the view through the camera. I described the SmartiPi Touch in another blog post on Raspberry Pi Mindstorms. Three EV3 Touch Sensors are attached to the operators console: two Touch Sensors pan the camera view left and right and the third triggers the cannons.
The system in operation is shown in the video above. The rate of fire is fast in this design, so the effect on a target is shown in slow motion in the video below—a group of alien invaders doesn’t stand a chance. The rate of fire could be slowed down by adjusting the power setting on the Medium Motor. But I like the rapid fire action.
